


Customers can reinforce the privateness in their bitcoin operations through the use of the RoninDojo Tanto at the side of Whirlpool.
Customers can reinforce the privateness in their bitcoin operations through the use of the RoninDojo Tanto at the side of Whirlpool.
All Bitcoin transactions are public, somebody can take a look at them. Whirlpool breaks deterministic hyperlinks to previous transactions and gives forward-looking anonymity. This a part of the sequence demonstrates Whirlpool your bitcoin as a way to take steps to maintain the censorship-resistant and permissionless attributes of Bitcoin the usage of your personal Bitcoin complete node as the personal backend in your Samourai Pockets and Whirlpool GUI.

When you overlooked Parts One and Two of this sequence, remember to take a look at them out to higher perceive the real-world implications of the usage of Bitcoin with none anonymity-preserving gear, and use Whirlpool on cellular.
Phase 1: A real-world example
Phase 2: Whirlpool on mobile
Phase 3: Whirlpool on desktop with RoninDojo Tanto (You’re right here)
Phase 4: Whirlpool on desktop with Sparrow Pockets (upcoming)
Manner 2: Whirlpool On Desktop With RoninDojo
This phase will reveal use Whirlpool on desktop with the Whirlpool GUI configured to run with your personal Bitcoin complete node, i.e., the Tanto by way of RoninDojo. This may increasingly construct at the data from the closing phase about the usage of Whirlpool on cellular best.
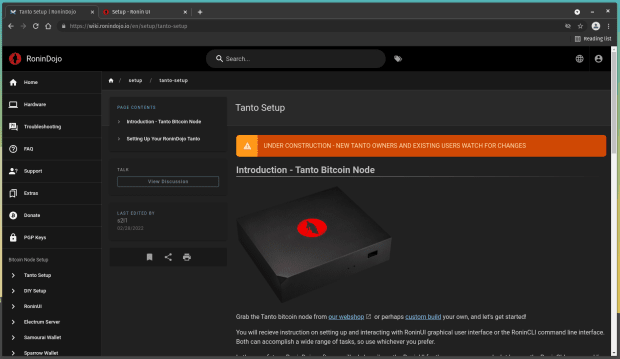
When you aren’t working your personal Bitcoin node then you might be trusting any person else’s. RoninDojo is a loose and open-source device (FOSS) developer workforce centered solely on development probably the most solid and adapted complete node for Samourai Wallet make stronger. With Samourai Pockets and RoninDojo mixed, customers are empowered with a mobile-first Bitcoin pockets that includes privacy-enhancing gear like a Whirlpool CoinJoin implementation and post-mix collaborative spending gear, all powered by way of the person’s personal self-hosted Bitcoin complete node speaking with the cellular consumer over Tor. This information demonstrates putting in a brand new plug-and-play complete Bitcoin node from RoninDojo referred to as the Tanto.
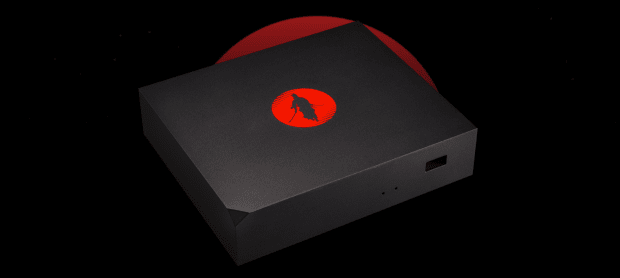
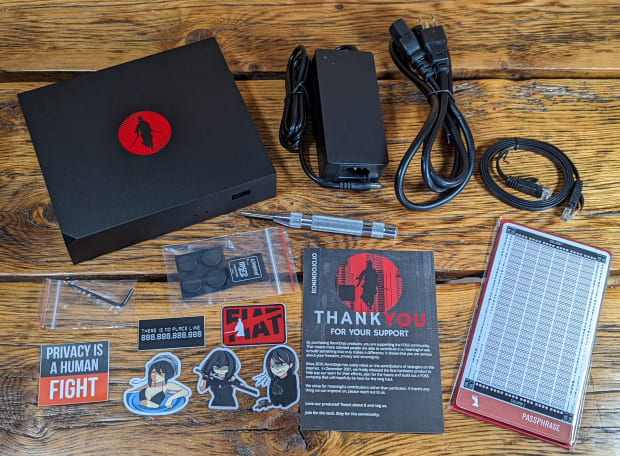
The Tanto comes preassembled and preloaded with the RoninDojo device, there’s no want to construct a subject material listing and order a number of items of {hardware} from more than one distributors. The Tanto includes a milled aluminum case and backside plate, painted black with a graceful RoninDojo emblem in pink. Throughout the case, the Tanto is powered by way of a RockPro64 board, an interface card, and an M.2 NVMe 1TB SSD. The Tanto additionally features a 32GB microSD card preloaded with the RoninDojo device symbol and gear provide. The whole thing you wish to have to get began is incorporated.
Moreover, the Tanto contains the RoninSteel stainless-steel seed word backup plate. Take a look at this guide to peer an illustration of the RoninSteel.
All in combination the Tanto contains:
– Aluminum case and backside plate
– Ronin X4-90 adaptor
– LED stripe with GPIO connectors
– Thermo pad, rubber toes, screws, and hex wrench
– RockPro board
– RockPro64 PCIe X4 to M.2/NGFF NVMe SSD interface card
– Energy provide
– M.2 SSD M-key, 1TB
– 32GB microSD card
– RoninSteel backup package
– Spring-loaded punch
– Ethernet cable
– Decal pack
– “Thanks” card
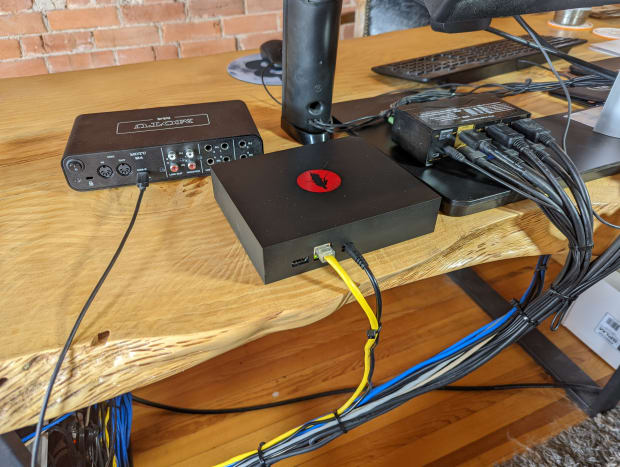
Step 1: Connecting
Connecting the Tanto may be very easy:
– Plug one finish of an Ethernet cable into the again of the Tanto.
– Plug the opposite finish of the Ethernet cable into your router or transfer.
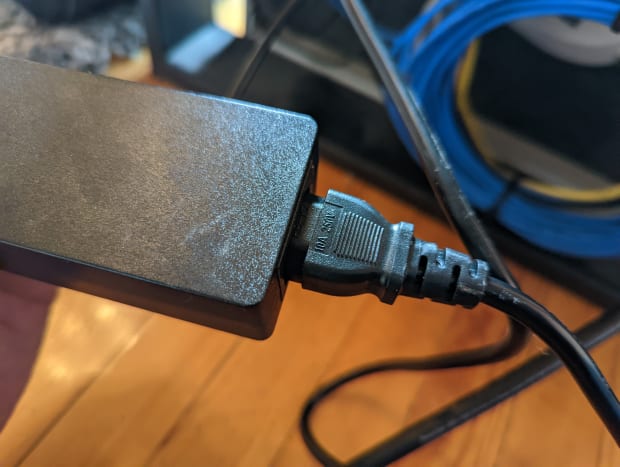
– Plug within the energy adaptor.
Subsequent, simply plug one finish of the facility cable for the incorporated energy provide into your outlet and the opposite finish into the transformer.
The Tanto will robotically energy on and get started the preliminary configuration procedure. Be sure that the facility isn’t interrupted right through the automated preliminary configuration procedure. This procedure takes kind of 10 mins and you’re going to understand the pink gentle light up beneath the Tanto as soon as this procedure is done. Then, you’re going to be able to login to the Tanto throughout the internet interface.
Step 2: Configuring
Configuring the Tanto may be really easy, it best takes a couple of mins and the elemental steps are to set your password, then log in.
Talk over with the legitimate RoninDojo Wiki for detailed directions and extra.
The use of a PC attached to the similar native community as your Tanto, open your favourite internet browser and sort “https://ronindojo.native” into the URL bar. This will have to convey up the RoninDojo welcome web page.
If that didn’t paintings, then you’ll be able to do so similar procedure by way of the usage of the native IP deal with of your Tanto as an alternative. This IP deal with can also be discovered by way of logging into your router and checking the listing of units below the DHCP rentals phase. Your router will have to have the native IP deal with had to log in, together with the password on a label someplace at the instrument. If no longer, the instructions are typically beautiful simple to search out with a web based seek for your producer’s router. Most often, you’ll be able to simply sort “192.168.0.1” or “192.168.1.1” or “10.0.0.1” into your internet browser and that may convey you on your router login web page. From there the username/password can range relying on producer however they’re typically one thing like “admin/admin” or “admin/1234” or “admin/password.” However, methods like Angry IP Scanner could also be used.
On this instance, the native IP deal with “192.168.69.17” is the only used to sort into the URL bar.
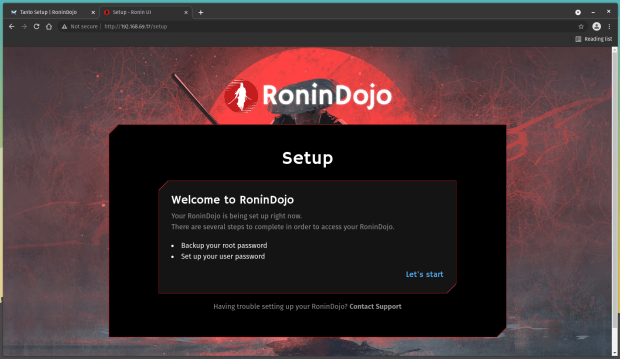
As soon as you might be on the RoninDojo welcome web page, choose “Let’s get started.”
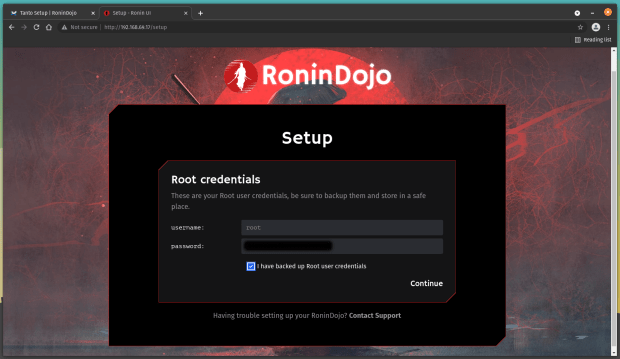
You’re going to be introduced along with your Root credentials; those are just like the grasp username and password for the Tanto’s backend. Save those main points in a safe position like a password supervisor and don’t percentage those with somebody for any reason why. You can not alternate those, they’re pre-selected for you. Be sure that you choose the field that claims “I’ve subsidized up Root person credentials,” then click on on “Proceed.”
Subsequent, you’re going to set your person credentials, which you’re going to use to get admission to the Tanto throughout the internet interface. The username is preselected for you, “ronindojo.” You’ll be able to create any password you want to use, simply make sure it’s no less than 8 characters. Repeat this password and be sure you safe those credentials in a protected position, like a password supervisor, and don’t percentage them with somebody for any reason why. Then click on on “End.”

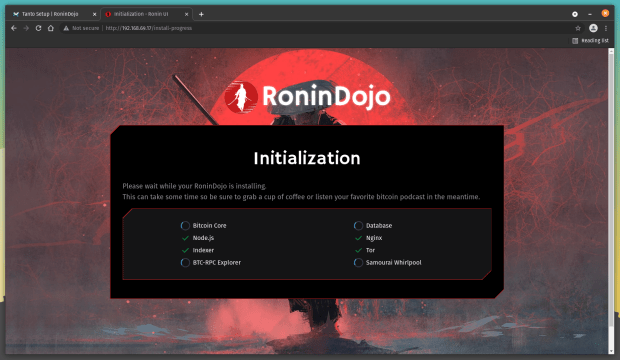
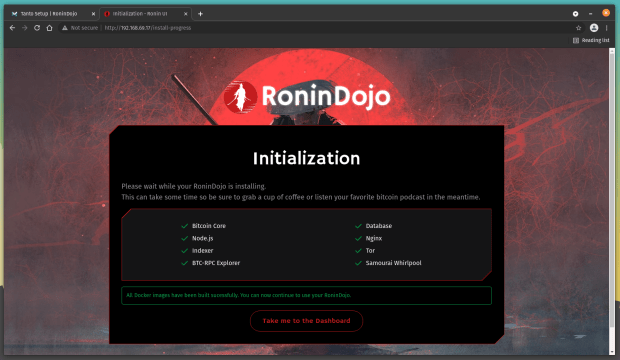
Subsequent, you’re going to see a number of products and services comparable to Bitcoin Core, Node.js, Indexer, BTC-RPC Explorer, Database, Nginx, Tor, and Samourai Whirlpool get started. This takes a couple of mins.
As soon as there’s a inexperienced take a look at mark subsequent to each and every provider, you’ll be able to click on at the “Take me to the Dashboard” button.
Step 3: Preliminary Blockchain Obtain (IBD)
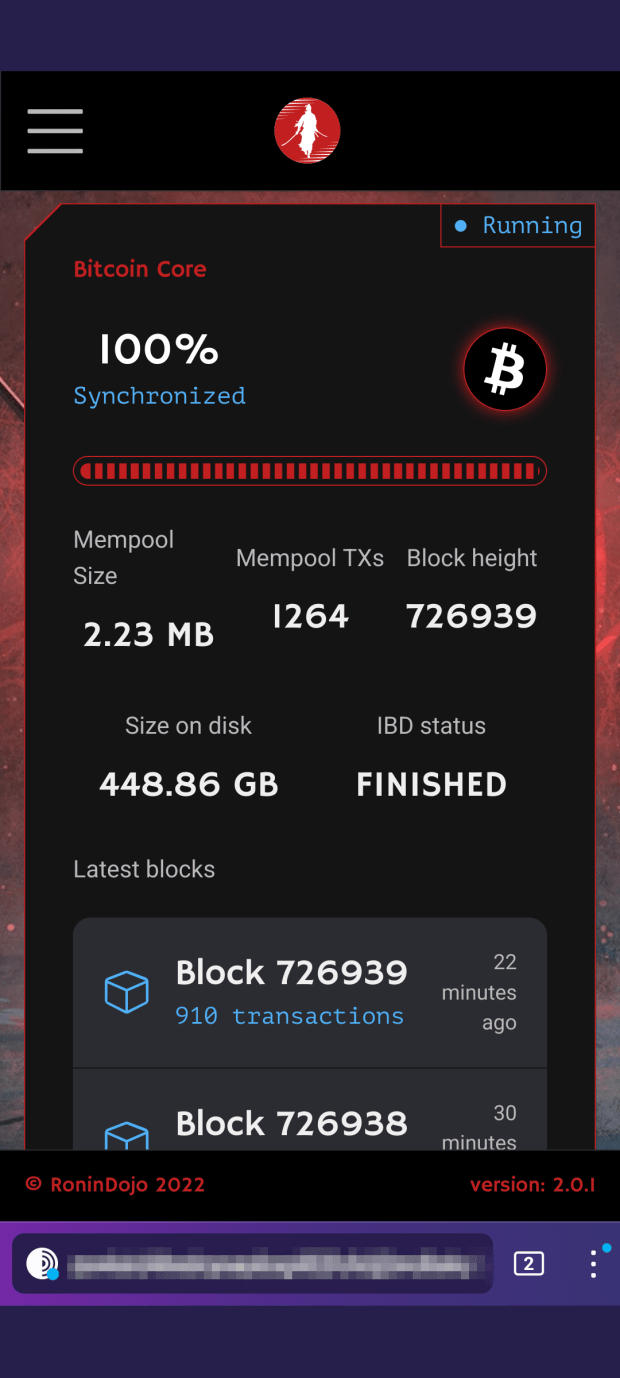
As soon as you might be at your dashboard, you’ll be able to see the development of the Bitcoin IBD and the vitals of your Tanto. The IBD will take about two days to finish, because the Tanto is connecting to different Bitcoin nodes and downloading all of the Bitcoin blockchain all of the as far back as the primary block from January 2009. As soon as the IBD completes, you’re going to have your personal complete reproduction of the blockchain and you’re going to use your personal reproduction to ensure your transactions in opposition to and show your balances to your cellular pockets.
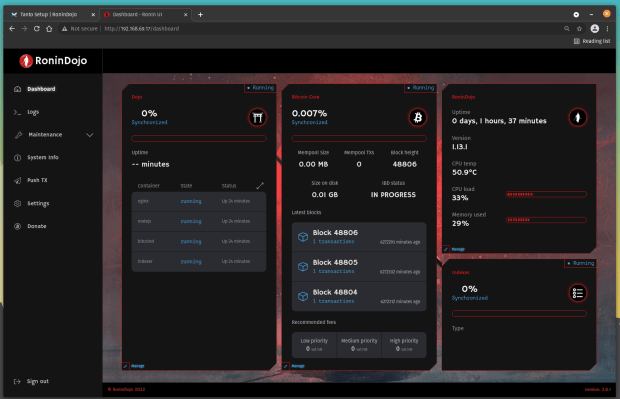
Any other vitals you’ll be able to track are uptime, model, temperature, CPU load, and reminiscence utilization. Let this procedure run for a few days. Tanto will log you out robotically after some idle time however the processes proceed to run within the background.
The IBD took a complete of two days, 21 hours, 49 mins on this demonstration.

Step 4: Indexing
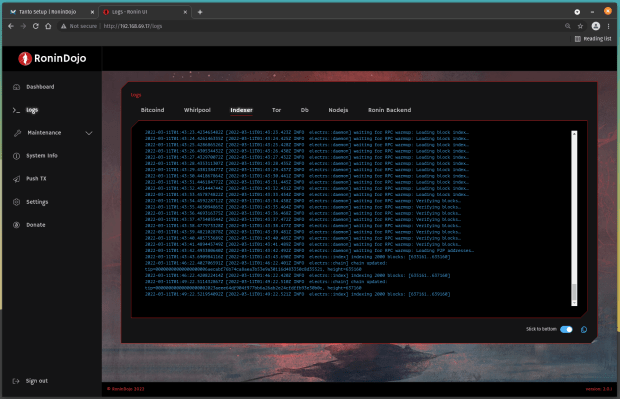
Now that all of the Bitcoin blockchain has been downloaded, it must be listed in order that it’s searchable. The indexing procedure starts robotically as soon as the IBD is done, and this procedure can take an extra day. Chances are you’ll understand that the “Indexer” standing within the decrease right-hand nook stays on 0%; do not panic! Merely navigate to the “Logs” choice at the left-hand facet menu after which the “Indexer” tab. You will have to see one thing like this screenshot beneath the place the blocks are getting listed in chunks of two,000. Simply let this procedure run to finishing touch, which once more can take some other 24 hours.
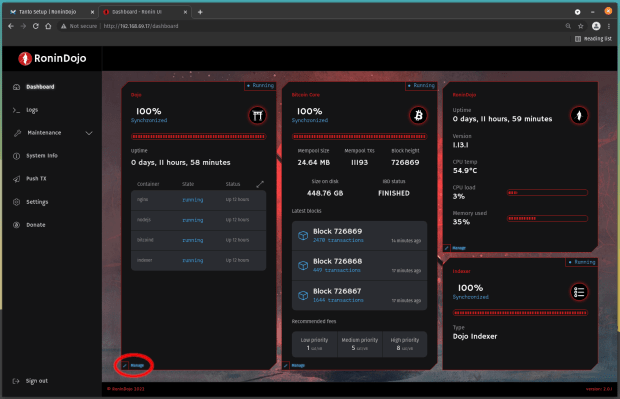
As soon as the Indexer has stuck as much as the newest block top, you will have to see each Indexer and Dojo reporting 100% synchronized.
Step 5: Connecting To Cellular
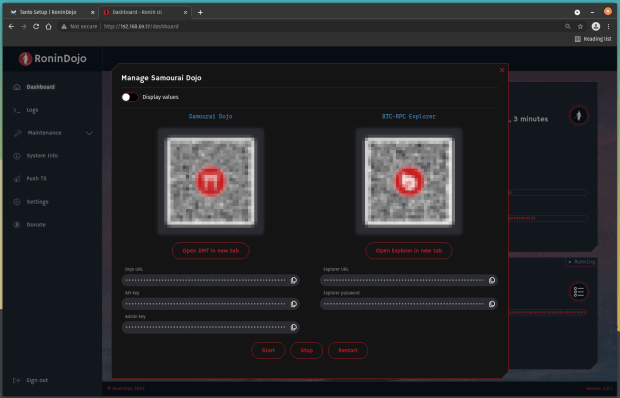
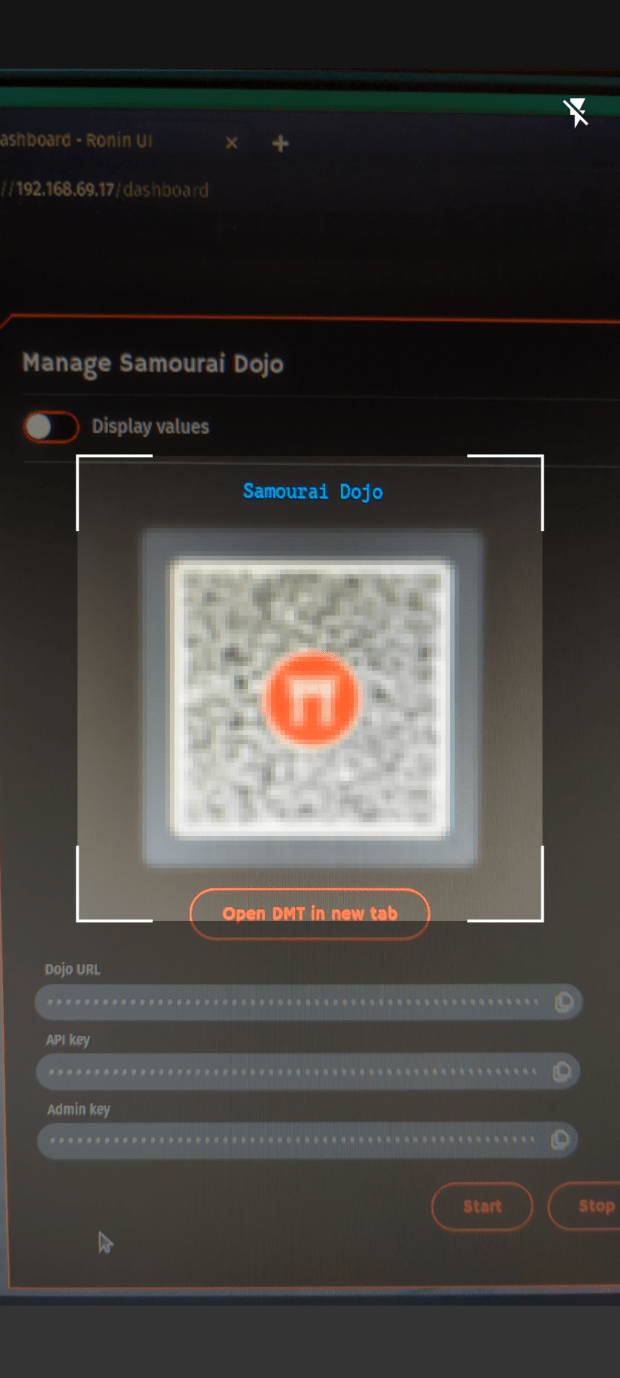
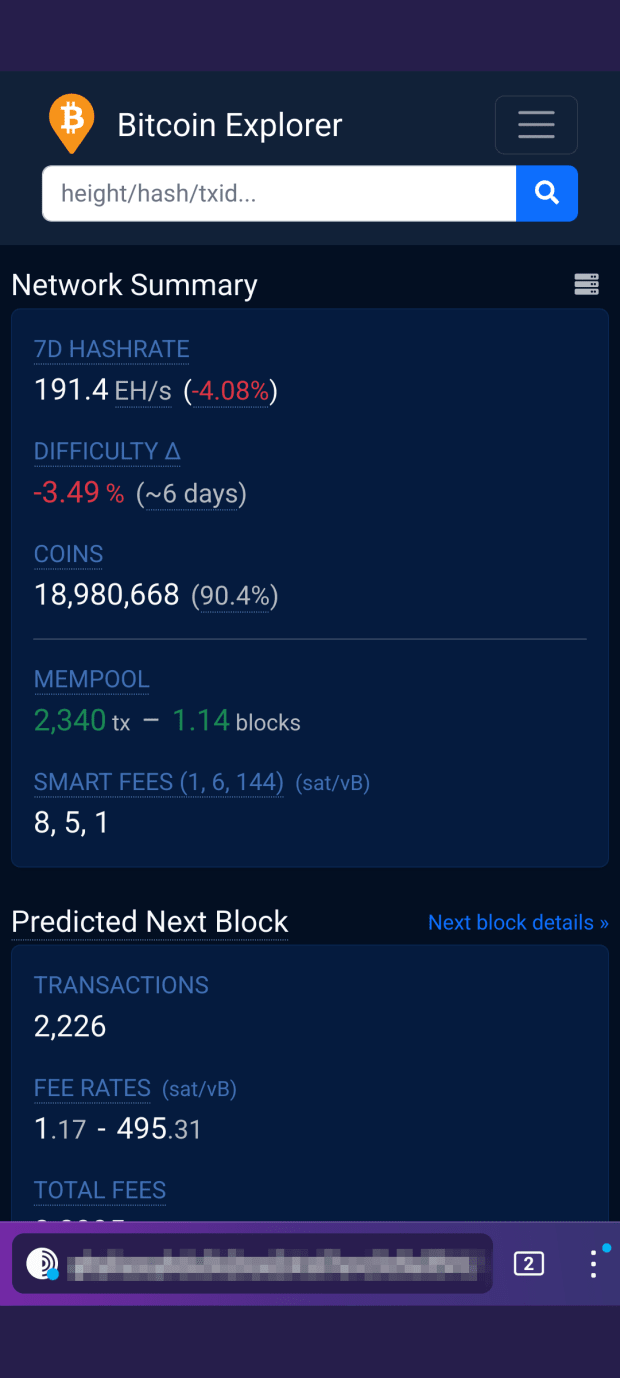
You’ll be able to click on on “Organize” within the decrease left-hand nook of the “Dojo” window and this may occasionally convey up the QR code that you’ll be able to use to attach your Samourai Pockets. Make sure you toggle “Show values” to make the QR codes legible. The opposite QR code is for connecting your personal BTC-RPC explorer. The explorer supplies some way to make use of your personal Dojo to feed knowledge to a full-fledged Bitcoin blockchain explorer over Tor. Replica the .onion URL and password for the explorer, paste into Tor Browser, use “ronindojo” for the username, and bookmark web page.
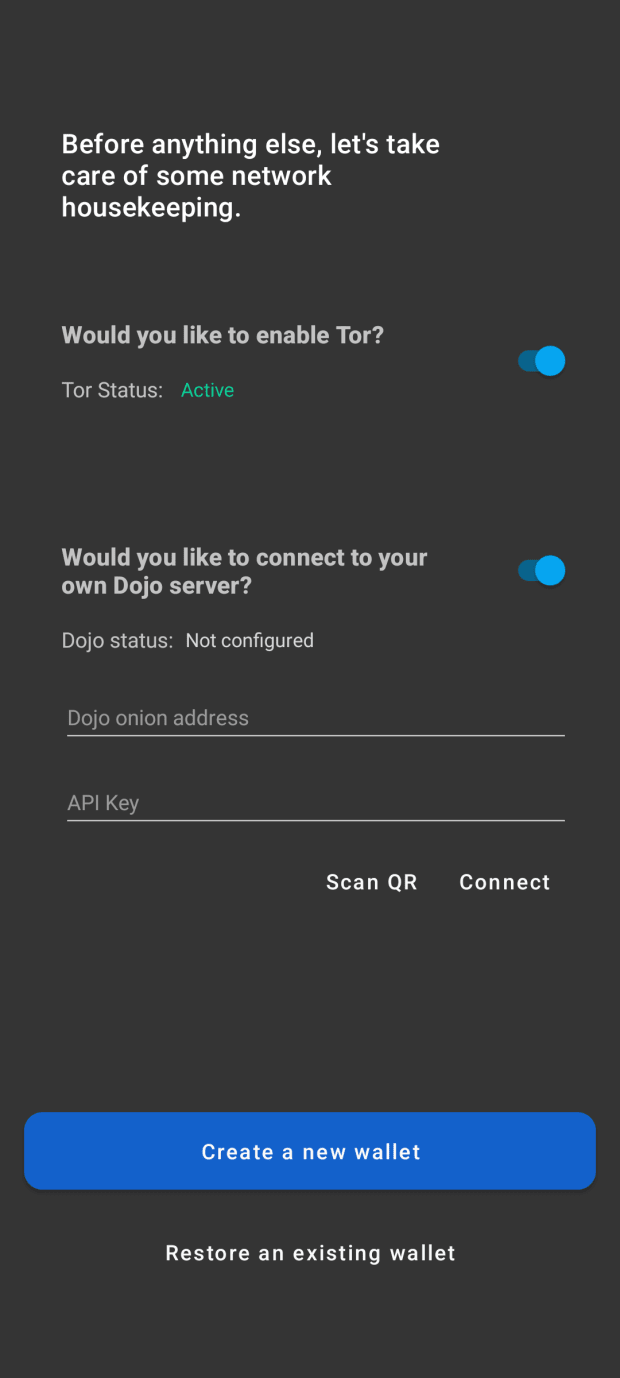
For your Samourai Pockets, from the house display, press the icon on the most sensible that appears just like the WiFi image. Toggle at the choice to connect with your personal Dojo. Then click on on “Scan QR” and the appliance will ask you to grant digital camera permission. Then scan the “Samourai Dojo” QR code to your Tanto dashboard out of your cellular instrument. Be sure to toggle at the strategy to show values to your Tanto dashboard so the QR code is legible.
Now your cellular Samourai Pockets will keep up a correspondence with your personal complete node. There are a few different essential choices to head over sooner than overlaying the desktop Whirlpool GUI.
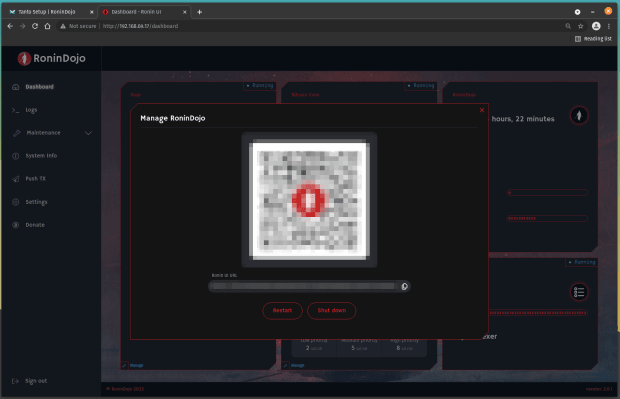
For instance, you’ll be able to log into your RoninDojo person interface (UI) out of your cell phone with the Tor Browser. From the dashboard, click on on “Organize” within the decrease left-hand nook of the “RoninDojo” window. This may increasingly convey up a QR code that you’ll be able to scan to practice the .onion hyperlink on your RoninDojo UI. Then input your RoninDojo UI password and bookmark this web page.
As soon as you might be logged into your RoninDojo UI on cellular, then you’ll be able to simply reproduction/paste the .onion URL and password for the explorer into your Tor browser as smartly. Go away the username clean, you’ll be able to bookmark this web page as smartly and now you may have a cellular block explorer that makes use of your personal Dojo as a backend and communicates with it by means of Tor.
Step 6: Set up The Whirlpool GUI
This phase will reveal attach the Whirlpool desktop consumer on your Tanto complete node and your Samourai Pockets. With this configuration, it is possible for you to to have your UTXOs blending nonstop within the background out of your desktop consumer and powered by way of your personal complete node.
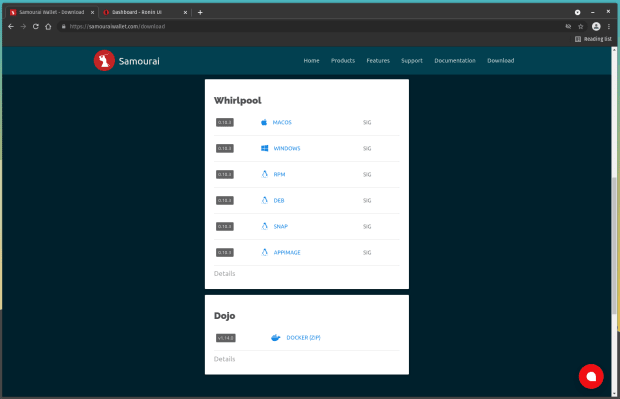
First, it is important to obtain the Whirlpool consumer suitable in your working gadget. The other choices together with accompanying developer signatures can also be discovered here and detailed set up directions can also be discovered here. Bear in mind you’re going to most probably want to set up OpenJDK as smartly, which is roofed within the set up directions.
*In a long term unencumber of the RoninDojo UI, the Whirlpool URL might be to be had from the internet interface dashboard and you’re going to not want to retrieve this data from the terminal as demonstrated right here.*
Step 7: Connecting Tanto With The Whirlpool GUI
After getting your Whirlpool consumer put in and your Samourai Pockets attached on your RoninDojo Tanto, you’ll be able to make an SSH connection to the RoninDojo and get started the Whirlpool provider. The Whirlpool .onion URL you wish to have isn’t to be had throughout the RoninDojo person interface dashboard. The Safe Shell (SSH) connection can also be made with the similar username password you used for the RoninDojo UI.
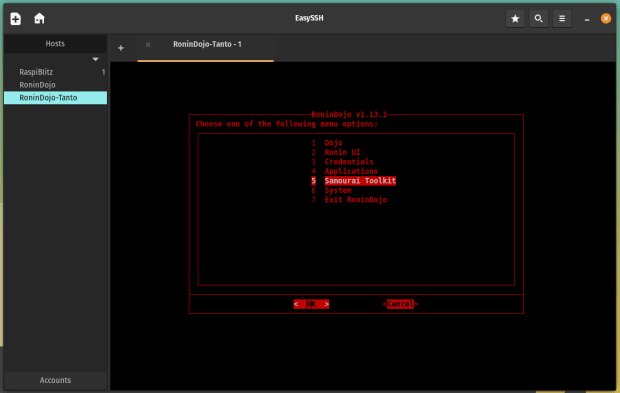
As soon as attached, navigate to “Samourai Toolkit” > “Whirlpool”:
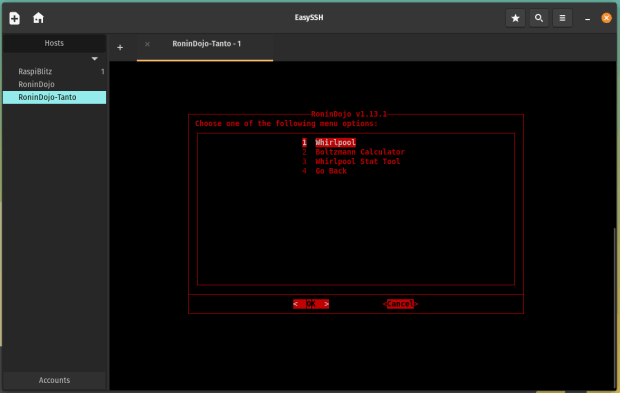
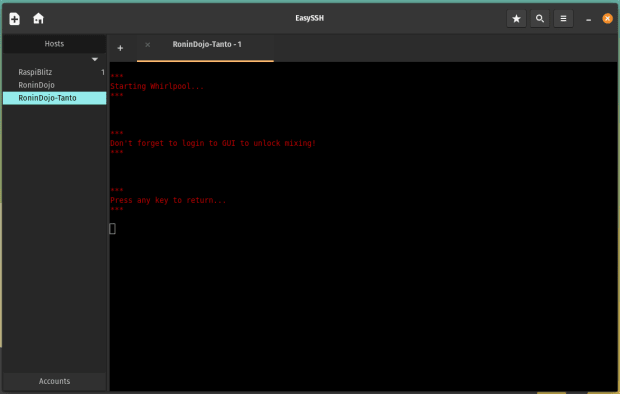
Then choose “get started;” a script will run in short after which you’ll be able to hit any key to go back to the principle menu when caused.

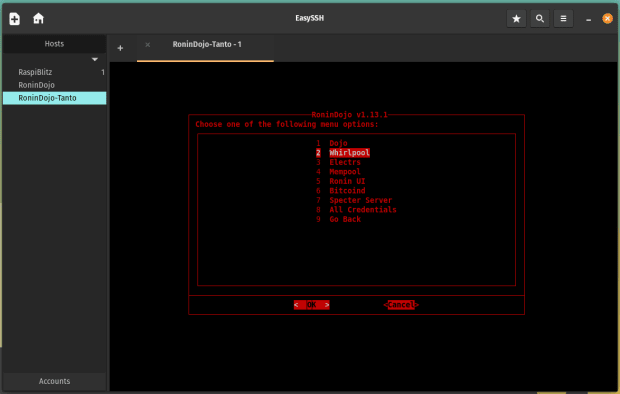
With the Whirlpool provider began, and again on the major menu, now navigate to “Credentials” > “Whirlpool.”

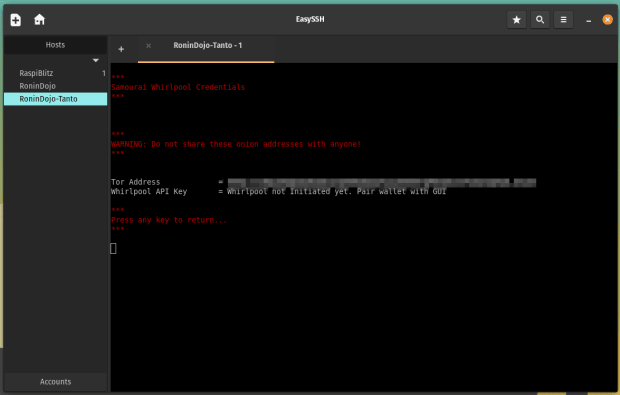
That is the place you’ll be able to retrieve the .onion URL you wish to have to make use of within the Whirlpool consumer graphical person interface (GUI) to get it configured. Spotlight this URL and use “ctrl+shift+c” to duplicate it on your clipboard.
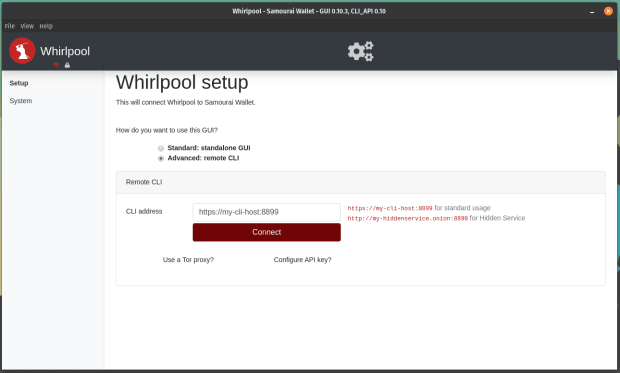
Now open the Whirlpool consumer software you put in previous. Make a selection the “Complex: far flung CLI” choice and the place it says “https://my-cli-host:8899” paste the .onion URL out of your RoninDojo terminal. Relying on whether or not or no longer you might be working a Tor daemon or simply the Tor browser, you might want to choose both “9050” or “9150” for appending the Tor proxy. Go away the API key clean; this may occasionally robotically be treated as soon as initialized. Then click on on “Attach.” Give the GUI a while, Tor connections can take a short while. Chances are you’ll want to take a look at this a few occasions sooner than the relationship is made.
Step 8: Connecting Samourai Pockets To The Whirlpool GUI
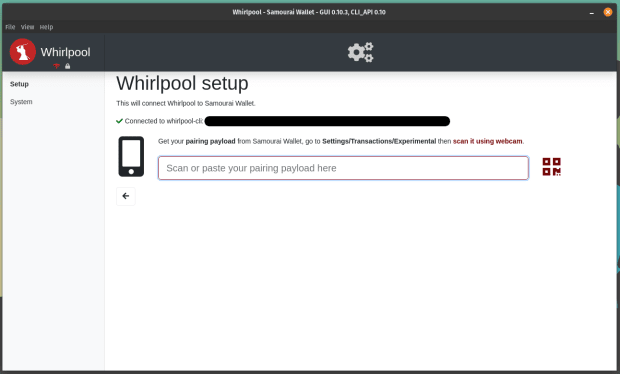
As soon as the relationship is made, you’re going to be introduced with a display asking you to enter the Whirlpool pairing payload out of your Samourai Pockets. In Samourai Pockets, click on at the 3-dot menu within the higher right-hand nook and choose “Settings” > “Transactions” > “Pair to Whirlpool GUI” on the backside. This may increasingly show a QR code that comprises your Whirlpool payload. Merely click on at the QR code choice within the desktop GUI and this will have to release your webcam, then grasp up the QR code to your cellular so the digital camera can scan it.
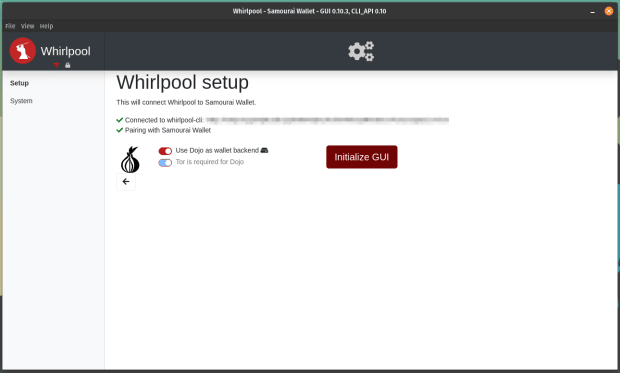
As soon as won, then click on on “Initialize GUI.”
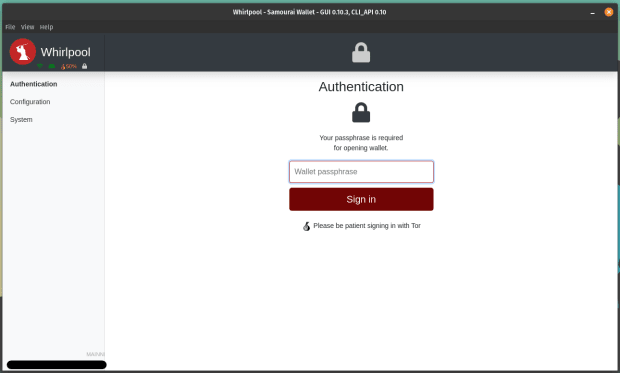
Subsequent, input the passphrase in your Samourai Pockets and click on on “Check in.”
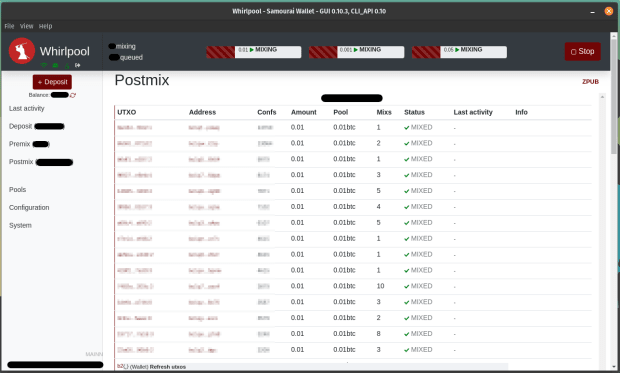
As soon as signed in, you will have to be capable to see your balances, blending task, after which you’ll be able to set goals for what number of mixes you want to reach. You’ll be able to even generate deposit addresses from the Whirlpool GUI.
Now while you begin mixes out of your cellular Samourai Pockets app, you’ll be able to shut the app afterwards and your UTXOs will proceed to be registered as to be had inputs to mixes as loose riders as long as your desktop consumer remains working. Plus that is all being achieved the usage of your personal node as a backend and speaking with it by means of Tor. Simply practice the very same steps as lined within the closing phase to begin Whirlpool mixes on cellular like customary.
The following a part of this sequence will reveal use Sparrow Pockets and Whirlpool, which is a brilliant choice for individuals who need the privateness holding advantages of Whirlpool however don’t have an Android cellular instrument to put in Samourai Pockets on.
It is a visitor submit by way of Econoalchemist. Critiques expressed are totally their very own and don’t essentially mirror the ones of BTC Inc or Bitcoin Mag.


